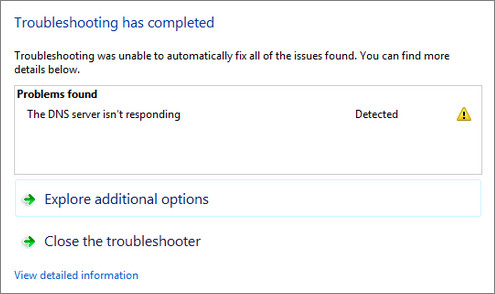
While trying to browse the internet you may have encountered the error that says, DNS Server is Not Responding. It may also show up with the websites name along with the message ‘Server DNS Address Could Not be Found.’ Though it is not a very common problem but it occurs once in a while when the DNS server that translates a domain name doesn’t respond for any reason. But you can fix this problem easily by following the methods given below.
Before trying anything complex, let’s do some basic tasks to narrow down the problem. First of all, try to load the website in a different browser to see if it’s a browser related problem. You can clear the browser cache, cookies and then give it a shot as well.
You can also try to connect a second device like a tablet or someone else’s laptop either wirelessly or wired to your network. Now try to browse that particular website and check if you still get the DNS Server Not Responding or DNS Server Unavailable error. If yes then follow the methods mentioned below to fix the problem.
Method 1 – Change The DNS Server Addresses
The DNS server address is usually obtained automatically, but you can set it to something more reliable. As the DNS server your PC obtained automatically is not responding, you can change it to one of the most reliable DNS servers out there. OpenDNS and Google DNS are considered to be the best and they are totally free. In our case we will use Google’s DNS server address. Let’s start off.
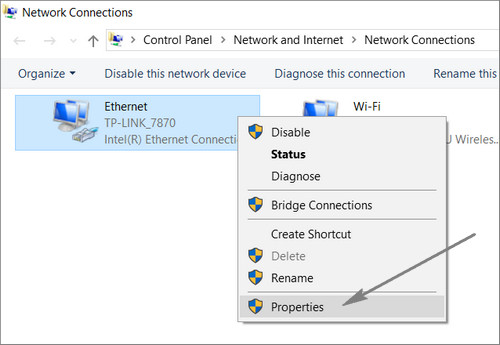
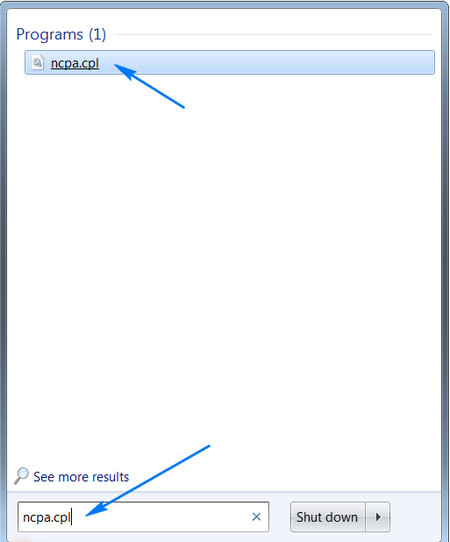
Windows 10 Users can simply type in ncpa.cpl into the Windows search box and press Enter. You can also Press on the Windows key from your keyboard and start typing which will take you to the search box.
Windows 7 users click on the Windows Key type in Run in the search bot and then type ncpa.cpl in the Run box and press Enter.

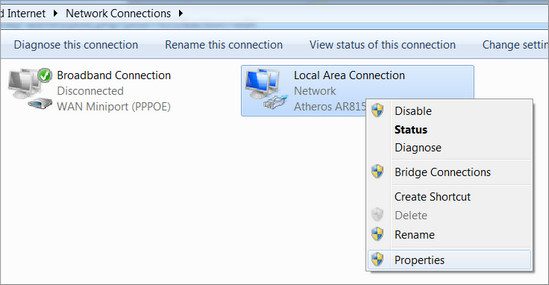
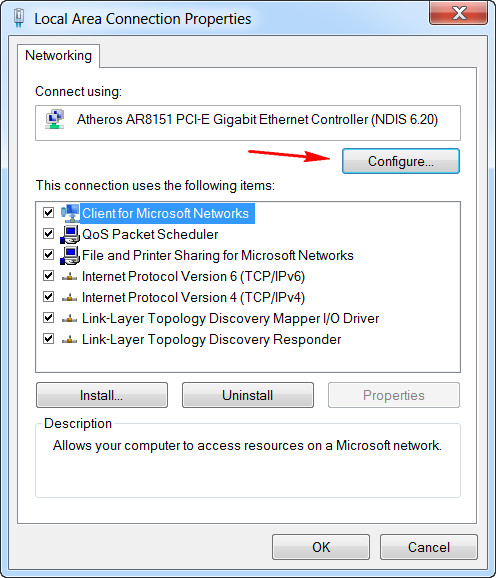
Now you will see the network connections and right click on the connection that you are using and click on Properties.
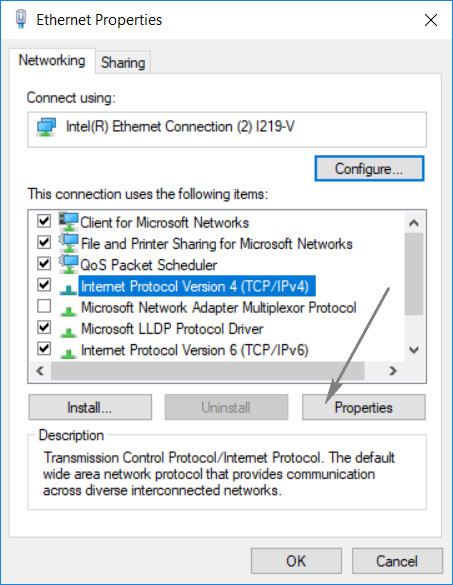
A new window will pop up, select Internet Protocol Version 4 (TCP/IPv4) and then click Properties again.
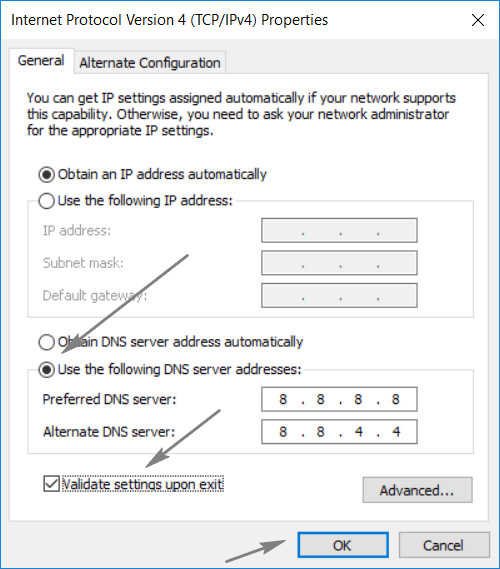
In that window select the radio button that says Use the following DNS server Addresses. Then in the Preferred DNS Server field type in 8.8.8.8 and in the Alternate DNS Server field type in 8.8.4.4 then check Validate Settings Upon Exit box and click OK. Now restart your PC.
This will change the DNS servers on only the computer. If you are using internet on a mobile using a router then you can check out this post on how to change DNS servers on routers.
The DNS servers used above are Google DNS server addresses but you can also pick any other free DNS server from this list if you don’t want to use Google’s DNS server. Now try to connect to your internet and browse the websites that you were getting error to see if the problem is solved. If it didn’t, then try out method 2 which is flushing DNS.
Method 2 – Disable Unused Networks
Usually windows installs extra connections even if you never use them. But it’s best to have only the one connection that you use regularly and remove the other connections so that they can’t cause any kind of connection issue.
If there are any other connections that you are not currently using, then you need to disable them. To do that Press the Windows Key from your keyword and type in ncpa.cpl in the search box just like we did in method 1. Windows 10 users have a round search icon right next to the Windows icon in the taskbar.
You can also find the network connections by navigating to Start > Control Panel > Network and Internet > Network and Sharing Center > Change Adapter Settings.
Now you will see all the connections that you are either using or not. Disable the connections that you are not using by right clicking on them and then clicking Disable.

In the picture above I’ve right clicked on the network that I’m using because the other ones are already disabled.
Method 3 – Flush The DNS of Your Computer
Windows and other operating systems usually store the DNS data in the cache This cache also store data of the visited websites and clearing the cache may solve the problem. To do that, click the Start button and type in cmd in the search box and press Enter from keyboard.
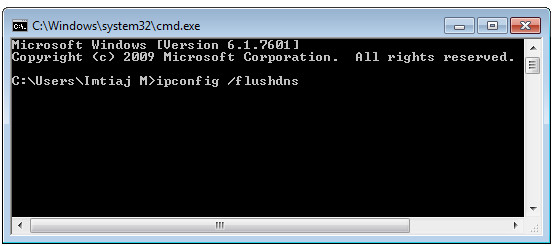
Command prompt will appear, then type in ipconfig /flushdns and hit Enter. This will remove all the DNS cache entry which just might resolve the problem. If not then also type in the following command and press Enter after each of them.
ipconfig /registerdns
ipconfig /release
ipconfig /renew
netsh winsock reset
Once done, restart your computer and check if the problem still exists.
Method 4 – Change Physical Address
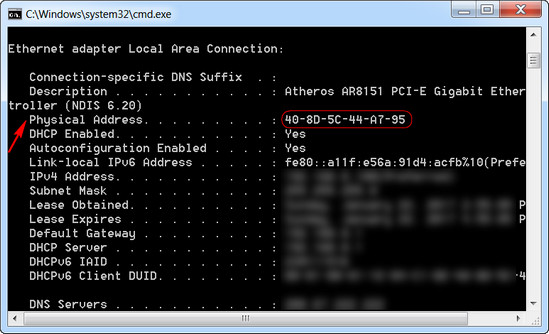
At this point we will change the physical address of the computer. Go to Windows Start menu and type in cmd in the search box and hit Enter. In command prompt type in ipconfig /all and press Enter. Now find the physical address from there and write it down somewhere.
Now to go Start menu again and type in npca.cpl in the search box and hit Enter. This will show you the network connections. Now right click on the active connection that you are using and select Properties.
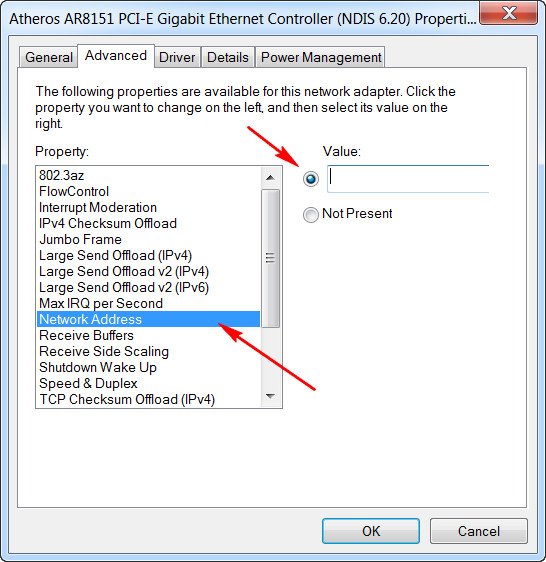
Now click on Configure and then select Advanced tab.
After that click on Network address and select the radio button that says Values. Now type in the network address that you have written down previously. Make sure write them without the dashes like this 408D5C44A795 and then click Ok and restart the computer.
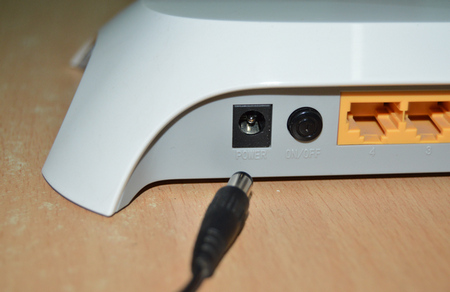
Method 5 – Power Cycle Your Router and Computer
If you are using a router then unplug the router from the power source and as well as the computer. Leave them unplugged for at least 1 minute. This will clear the memory and release residual charge. Then plug them in again, turn them on and wait for them to fully start and connect. Now see if the problem is solved or not.
If you are using wireless network, you can also use an Ethernet cable to connect your PC directly to your router and check if you still get the error message. Now, if the problems is still there then move on to method 4 to try some other fixes.
Method 6 – Some Other Methods
If the three methods above doesn’t work for you then try some other methods listed below.
1. Uninstall Antivirus
Some people reported that after uninstalling their Antivirus program (mostly McAfee) the problem was gone. You may try some other good free Antivirus such as Avast or AVG.
2. Disable Your Firewall
Some people reported that after disabling their firewalls they problem was gone. This could be the solution for you too. Disable your firewall and check for the error.
3. Try Connecting in Safe Mode
Booting your computer in safe mood and trying to connect will help you determine if any third party software is causing the issue as the safe mode will only load the needed files for windows. To do this reboot your computer and hold down the F8 key. Then select Safe mood with networking from the list of options. Then test the connection and if you can connect, then probably any of the third party program is causing the issue like a firewall or antivirus software.
The methods listed above are known to solve the DNS server not responding error that you get in your computer. If you still couldn’t solve the problem then comment below by mentioning which methods you tried and which you didn’t and I will try my best to help you out.


Leave a Comment